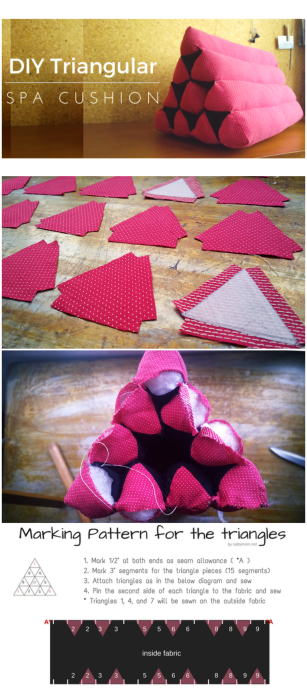
DIY Triangular Spa Cushion
 It took me 2 tries and lots of staring into space , slowly deconstructing the cushion into one linear piece before I got it. On the first try, I thought I could just sew a long row of triangle tubes…
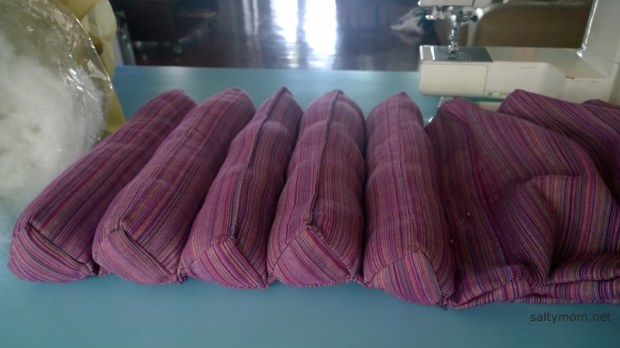
Stuff them up and roll them into a triangle wedge shape …
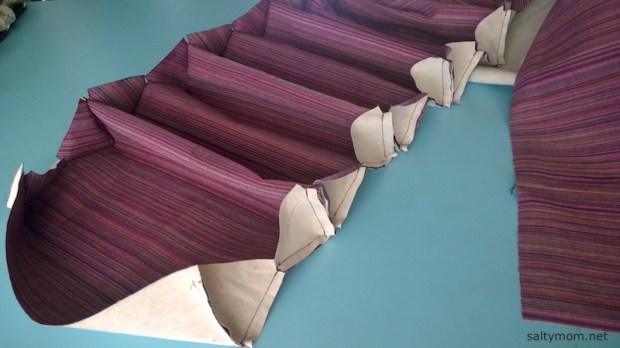
 That did not work. However, it did made a nice firm back rest when draped over a chair. My dad owns it now. I realised that the reason the roll won’t bend was because I didn’t create the corners of the triangle. On the photo below, 2 sides of the triangles are sewn on the same fabric to create the triangle shape :
So I came up with this pattern ( and a youtube vdo at the end of the post ) :
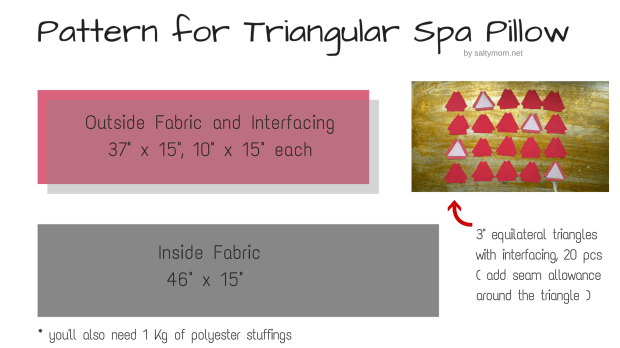
I added interfacing on my outer fabric to stiffen it up a bit. If you like a wider pillow, just increase the width from 15″ to the amount you want.
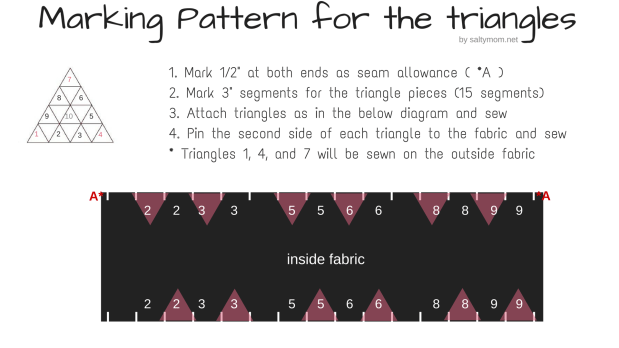
I also numbered the triangles so you’ll know where you are at. The 3 triangles on the outside fabric will form the corners, hence the shape of the triangle. For triangle #10, you have to sew it into a tube, leaving one side of a triangle open to flip the tube. Stuff it with polyester filling and insert it into the centre ( last step ).
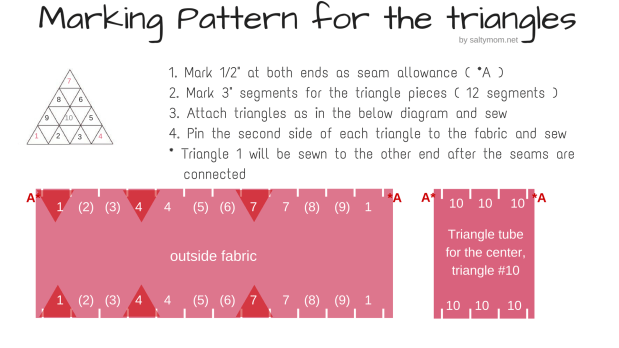
It may seem confusing at first, but if you got all the triangles in the right spots, things should go well.
Watch the vdo to get an idea how the whole thing is put together. ( for some strange reason i can’t add the whole vdo to my post.. maybe it’s the magic mouse. Today it decided it won’t do any right clicks. I’m so confused. )
*update : finally got the vdo embedded, enjoy 🙂
Notes :
- After you sew all the triangles on the inside and outside fabric, sew up one long side by aligning the triangles into their respective slots.
- After that, flip it so the correct side is facing you, then sew down to form the tubes. Since the other side is not sewn, you will have an opening to put the stuffings in.
- You have to get the stuffings in as stiff as you can. I use my hammer’s handles to push them in. This style of cushion is very stiff.
Okay, that’s all for now.
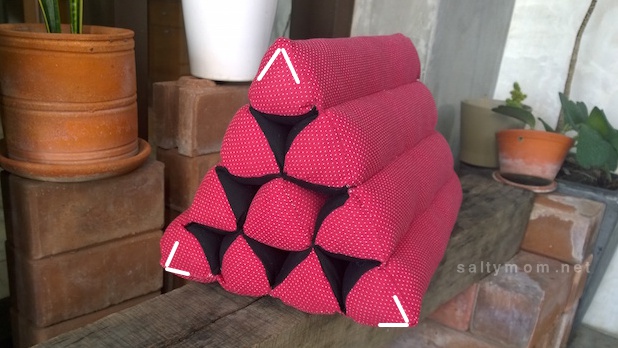
*updated photo for sharing on pinterest :
and a plug to my affiliates post , in case you want to buy readymade ones 🙂


What I want to know is how you fill the pillows and what you used to fill the triangles. Does polyester filling last or does it compact in a few weeks and become flat?
I use the handle on my hammer to compress the filling. A lot of filling went inside that pillow, and since it is a hard pillow you can actually use scrap fabric instead.
The pillow retains its shape, i guess it’s because the fillings go into individual tubes n it’s easier to compress them that way.
I stupidly decided to use bean bag filler instead and am having the hardest time Filling the triangles. And I’m afraid they will not last a long time once i get them filled and sewed up. Wish I saw ur video first.
LoL, everybody have a fun story to tell when they mess with bean bag fillers. those white static balls from hell !
It looks like it snowed last night in my living room. I have 3.5 more of these giant bags of snow. No idea what to do with them. Never again! Where do you buy your fillers?
Ha! I remember running after them with a broom, they keep rolling away. I switched to handpicking them n when i drop them into the bin, they decided to cling onto my hands ! Maybe u can make a giant bean bag with the leftovers. I got mine locally at a shop in Bangkok.
Pingback: DIY a Summer Dress and Bias Binding Tutorial | Salty*mom
I’m making this right now! Can you please describe the final (stuffed) dimensions of the pillow? Thanks!
Hi Judy, I’m so excited you are making this ! The base of the pillow will be 12″ ( 4 triangles x 3″ ) , the length is 14″ and the height about 10.5″.
This pattern is adjustable. For example if you want the base of the pillow to be 16″, you just divide 16/4. Then you create an equilateral triangle with 4″ sides. The outside fabric ( the one in pink ) have 12 segments, so multiply 12*4 = 48, and add 1″ for seam allowance. You then recalculate all the other pieces base on the new triangle’s side. The length is a lot easier, just add 1″ to the new measurement.
Happy sewing !
Thank you!!! appreciate the quick response~
you’re welcome !
Hello again! So… I am so close! I have all the lines sewn across and am piecing the ends together. But I’m confused about the end triangles- number 1 on the outside fabric is sewn on only one side. When does the other side get sewn? Before doing the inside seam across the end?? Thank so much for the help!
Similar question for the outside triangle on the other end — it should be closed and one side is still open. Seam th, too, before doing the ends?
Got it! Thanks~
LoL, how did it go?
It turned out so great!!! I made it about 24 inches wide, with 4 inch triangles, and filled it with kapok. I made it for my son, who lived in Thailand for a year. He really loves it. Thank you!
Thank you ! I’m so glad it turned out great and your son loves it 🙂 This is quite a complicated project, but you’ve nailed it !
Am following video, sewing, then going back to video — it’s gradually coming together. But am confused by my next step. Video says to ‘sew ONE of the long side’ (one in caps so I assume that’s important). Have done that, with right (correct) sides together, and have flipped to right (correct) side, and pushed triangles into shape, as shown.
Now I’ve started pinning and marking the lines to form the tubes, am going to tack them first as it’s fiddly to get them right.
This is where I’m unsure. The other long edge has not been mentioned. Is it still open at this stage or should I have sewn that too? I’ve watched and re-watched the whole thing, and I just can’t tell!
on the other long side, there will be one side of the triangle that is left open ( to fill in the stuffing.) That is also the side of the triangle where the black and pink fabric meets.
and thanks for the ko-fi !! I just saw the notification 🙂
You’re welcome to the ko-fi! Worth it for the free ‘pattern’ and advice 🙂
Thank you — all of a sudden the penny dropped and it made sense. Part of my problem was that I hadn’t yet stitched the second side of the triangles on the outside fabric, as I was unsure what was meant by ‘adjacent side’ (ie which side). I think I’m getting there!
Happy you figured it out ! If you get stuck just ask 🙂