DIY Messenger Bag + Part 1 Tutorial
I made this for my daughter and is in the midst of sewing up another one in purple. Thought I’ll share it as a tutorial 🙂 The size is about 35.5 cm wide x 26 cm tall x 8 cm deep . It has an adjustable strap, half-hidden buckles, removable front flap ( so you can just sew another flap, instead of a whole bag , if you get bored of the design ), pocket organiser with zipper sides for easy access to keys and phones, side pockets that fit a 600 ml water bottle, and also a wide inner pocket.
The flap in this version have some slots for attaching stuffs , and the black part is velcro for sticking patches. I got the idea from tactical / army bags.

The fabric used is canvas and a sponge fabric , like those they use to make notebook sleeves. I’ve got a photo in this post. For interfacing, I use a thin flexible plastic fabric which I’ll show you in later posts. But ! you can use whatever fabric you want as interfacing or the lining. Just test sew the three together to see if you like the thickness / stiffness of the bag.

I’ve finished up the pocket organiser and the side pockets. Here’s the first part ( you can click to get a larger image ) :
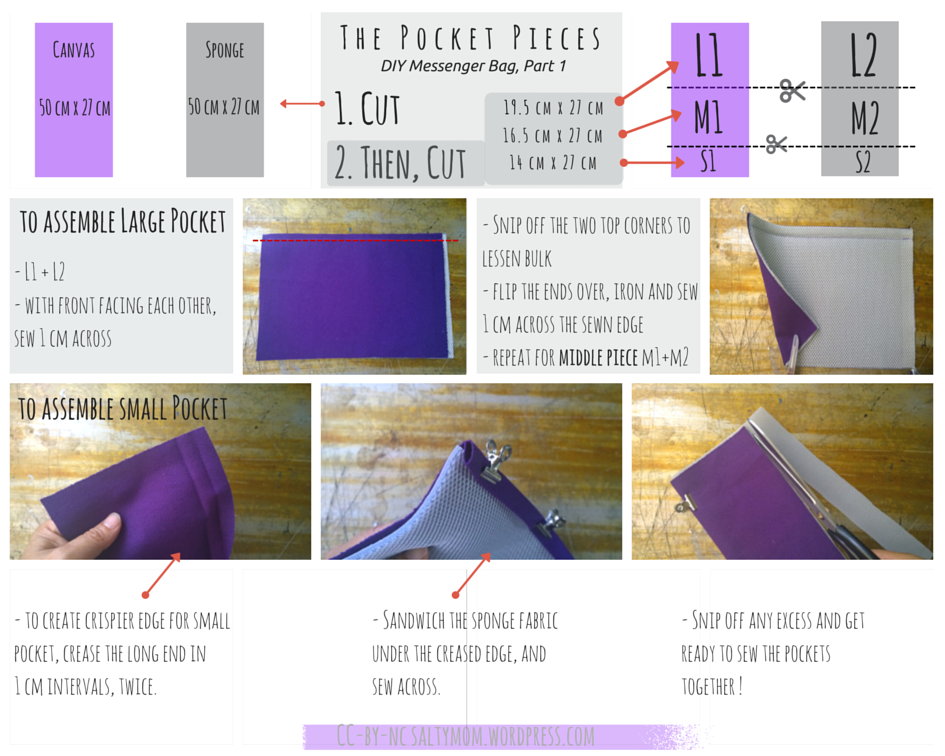
 Note : On step 3, I sew the sides in different directions and it came out lop-sided. I think this is caused by all the air in the sponge fabric. I later ripped out the stitches and re-do it.
I created the instructions with Canva , using all the free stuffs. The website is pretty easy to use and they also have a design school section showing how to use fonts, colours, and other design elements.


It’s excellent! Makes me wish even more that I sewed.
Pingback: DIY Messenger Bag ( part 1.2 on Zippers ) | Salty*mom
Thanks for sharing all these tutorials, I really wanted to make a bag like this one. I find it is hard to fit my laptop and my books in most bags, so I was looking to make one to custom fit my stuff. I love the design of your bag, and I bet the pockets are really useful. https://www.wattsbags.com/professional-sales-bags/salesman-combo-bag/info